Fine'. This is the end of a series about "How to Cook When it's Already Time to Eat."
Even the best laid plans go wrong. I can't count the number of times I've forgotten to thaw hamburger or take out a lasagna or start the Crock-pot. But here are some emergency supper ideas that take just minutes:
- Frozen pizza, taquitos, burritos, nuggets etc.
- Voila! bag meals
- Frozen tilapia or other individually-packed filets - thaw in warm water for a few minutes; sprinkle with seasonings and it only takes 10-15 mn to bake!
- Buy hamburgers or tacos at a fast food joint and provide your own sides from the pantry
- PBJ (the boys love these nights)
- Snack food (you'll be deemed a master chef if your munchkins are like mine!)
- Big 'ol can of soup
- Tuna salad sandwiches
- Grilled cheese with tomato soup
- Hot dogs (keep them in the freezer and nuke)
- Pizza Quesadillas (cheese, lunch meat or pepperoni, and spaghetti sauce in a tortilla - grill in skillet until cheese melts)
That's it. That's all I got. And even with all these strategies, it can still be a jungle around here at suppertime. But at least the monkeys are usually well-fed.
For 7 more tips, follow the links at How to Cook When it's Already Time to Eat.

Showing posts with label organization. Show all posts
Showing posts with label organization. Show all posts
Wednesday, March 12, 2014


Sunday, March 9, 2014
H2C: Don't Forget the Sides
Still putting out ideas for my series: How to Cook Supper When it's Already Time to Eat.
Side items are the bane of my existence. I think the reason I love casseroles and all-in-one pot dishes is so that I don’t have to come up with companion foods. When I’m on my game (it’s a rare occurance) I have sides pre-made and stored in the fridge. We might eat on one for a few meals. Here are my easy go-to sides:
- Belazy paleo/clean eating/(insert trendy diet name here) and call fresh fruits and raw veggies a side item. I serve fruit washed in a small colander - fruit doesn’t last long in this household, so I just store the colander in the fridge. I also have a colander of fruit on the table for decoration and handy eating. We take our veggies washed and cut up, served with Ranch dressing for dipping (We just started using sour cream and ranch powder since we just figured out that it has way less fat and calories than ranch dressing - and it's WAAAAY better)


- Salad - I chop up a head of iceberg and a package of leaf lettuce, shred a carrot or two with my big box shredder, and maybe cut up a cucumber or some green onions and store it in a large, lidded bowl. I also try to keep salad toppings and/or homemade croutons on hand. One head of lettuce will usually get us through 2-3 meals. If we want tomatoes or cheese, I store it separate and we just put it on at the table so the salad doesn’t get soggy. A pasta salad would work well, too.
- Seasoned butter for toast - I stir garlic salt, oregano, basil, and other herbs and spices into a stick of butter and store for a quick swipe onto toast
- Canned fruit salad
- Warm up canned goods - Baked beans, green beans, corn, and other canned goods don’t take long to season and heat up.
- Boxed pasta or rice sides
In the summer, when we’re overwhelmed with garden produce, this is a “salad” I try to keep on hand.
Cucumber and Tomato salad
- cucumber
- tomatoes
- onion
- dressing (I use sweet vinegar and oil. My mother-in-law uses seasoned rice vinegar. I’ve had a delicious concoction of vinegar, olive oil, sugar, and spices. They're all good--play around with it)
1) Thinly slice all vegetables and toss with dressing
2) Store in a lidded container in the refrigerator
For 7 more tips, follow the links at How to Cook When it's Already Time to Eat.
Side items are the bane of my existence. I think the reason I love casseroles and all-in-one pot dishes is so that I don’t have to come up with companion foods. When I’m on my game (it’s a rare occurance) I have sides pre-made and stored in the fridge. We might eat on one for a few meals. Here are my easy go-to sides:
- Be
- Salad - I chop up a head of iceberg and a package of leaf lettuce, shred a carrot or two with my big box shredder, and maybe cut up a cucumber or some green onions and store it in a large, lidded bowl. I also try to keep salad toppings and/or homemade croutons on hand. One head of lettuce will usually get us through 2-3 meals. If we want tomatoes or cheese, I store it separate and we just put it on at the table so the salad doesn’t get soggy. A pasta salad would work well, too.
- Seasoned butter for toast - I stir garlic salt, oregano, basil, and other herbs and spices into a stick of butter and store for a quick swipe onto toast
- Canned fruit salad
- Warm up canned goods - Baked beans, green beans, corn, and other canned goods don’t take long to season and heat up.
- Boxed pasta or rice sides
In the summer, when we’re overwhelmed with garden produce, this is a “salad” I try to keep on hand.
Cucumber and Tomato salad
- cucumber
- tomatoes
- onion
- dressing (I use sweet vinegar and oil. My mother-in-law uses seasoned rice vinegar. I’ve had a delicious concoction of vinegar, olive oil, sugar, and spices. They're all good--play around with it)
1) Thinly slice all vegetables and toss with dressing
2) Store in a lidded container in the refrigerator
For 7 more tips, follow the links at How to Cook When it's Already Time to Eat.
Saturday, March 8, 2014
H2C: Cook Tomorrow's Supper After Tonight's
Here's the fourth tip from the series How to Cook When it's Already Time to Eat.
This method works great for casseroles and Crock Pot meals. We eat Meal #1 tonight, but I prep two lasagnas. One I’ll keep in the fridge, then chuck in the oven when I get home tomorrow evening. The other goes in the freezer for another time.
If you can’t prep a whole meal, you can at least get ahead. If I need chopped onions tonight, but I know I’ll also need them for two other meals I have planned this week, I just chop of extra and store it in the fridge. I do the same for shredded cheese and seasoned olive oil or butter for breads or toast.

One of my family’s favorite recipes is my mom's fried rice. Although it is good leftover, it’s best served hot and crispy. Even though we love it, I often don’t put it on the menu, because it requires a lot of chopping and dicing. But if I pre-chop all the veggies and have the meat already cooked, it really doesn’t take that long. I just have to throw it all together and fry it.

Fried Rice
- 4 servings rice
- 1/3 c olive oil
- matchstick or shredded carrots
- diced onion
- diced peppers
- water chestnuts
- 1/2 c frozen peas and/or frozen stir fry veggies
- 3-6 eggs
- Cooked, chopped meat (chicken, fish, deer steak, etc.)
- 1/8 c Asian ginger dressing
- 1/3 c soy sauce
1) Cook rice and meat (or use thawed meat from your freezer stash).
2) Saute' fresh veggies in oil.
3) Push veggies to side, add eggs and scramble in oil.
4) Add dressings and frozen vegetables until thawed.
5) Add rice and meat. Cook until rice starts to get crispy.
For 7 more tips, follow the links at How to Cook When it's Already Time to Eat.
If I get home around 5:00 and we want to eat at 6:00, I probably don’t have time to cook and dice chicken, cut up vegetables, and assemble it all into a casserole that takes 45 minutes in the oven. But if the casserole is already put together and I just throw it in the oven when I get home, I have 45 minutes to get ahead for the next night. This is how I do a lot of my cooking--either while tonight’s supper is cooking or after the meal is eaten and I’m cleaning up. Either way, tomorrow’s supper gets at least partially prepped tonight.
This method works great for casseroles and Crock Pot meals. We eat Meal #1 tonight, but I prep two lasagnas. One I’ll keep in the fridge, then chuck in the oven when I get home tomorrow evening. The other goes in the freezer for another time.
If you can’t prep a whole meal, you can at least get ahead. If I need chopped onions tonight, but I know I’ll also need them for two other meals I have planned this week, I just chop of extra and store it in the fridge. I do the same for shredded cheese and seasoned olive oil or butter for breads or toast.
One of my family’s favorite recipes is my mom's fried rice. Although it is good leftover, it’s best served hot and crispy. Even though we love it, I often don’t put it on the menu, because it requires a lot of chopping and dicing. But if I pre-chop all the veggies and have the meat already cooked, it really doesn’t take that long. I just have to throw it all together and fry it.
Fried Rice
- 4 servings rice
- 1/3 c olive oil
- matchstick or shredded carrots
- diced onion
- diced peppers
- water chestnuts
- 1/2 c frozen peas and/or frozen stir fry veggies
- 3-6 eggs
- Cooked, chopped meat (chicken, fish, deer steak, etc.)
- 1/8 c Asian ginger dressing
- 1/3 c soy sauce
1) Cook rice and meat (or use thawed meat from your freezer stash).
2) Saute' fresh veggies in oil.
3) Push veggies to side, add eggs and scramble in oil.
4) Add dressings and frozen vegetables until thawed.
5) Add rice and meat. Cook until rice starts to get crispy.
For 7 more tips, follow the links at How to Cook When it's Already Time to Eat.
Friday, March 7, 2014
H2C: Whatta Crock!
This is the next installment in a series about cooking when you really don't have time to cook. For the rest of the series, start here.
There’s something about coming home to the smell of a meal that’s cooked all day in a slow cooker that makes you feel like a rock star. Also, slow cooked meals are often healthy and have several food groups all rolled into one meal. My favorite use for the Crock-pot is cooking chicken from frozen to shreddable. I have a lot of recipes that call for cooked, cut-up chicken. My sister-in-law taught me that you can throw frozen chicken in the pot with a cup or two of chicken broth and some seasoning and come home to perfect, shreddable chicken. I just dump off the broth and stir the chicken with a fork and it’s ready to throw in my chicken dish. You changed my life, Jenica! You can also just add BBQ sauce to the shredded chicken (or a beef or pork roast cooked all day in juice) and have excellent BBQ sandwiches with no effort.
Almost any soup recipe can be made in a slow cooker. I dump all the ingredients in the pot the night before, cram the pot in the fridge, and set it in the cooker the next morning.
There are a wealth of Crock-pot freezer recipes. I think I have four sites pinned on Pinterest (on my cooking board or my "did it" board) each linking to four or five recipes. The beauty of these recipes is that you make them ahead (on a weekend or some other free time), throwing all the ingredients together in a gallon freezer bag. The day you want the meal, you just peel the bag off of the ice chunk, throw it in the Crock-Pot, and come home to a hot veggie and meat entree. Our two favorite freezer bag recipes:
Teriyaki Pork Chops and Hawaiian Chicken Sandwiches (and several others) from Saving You Dinero
And another favorite, though I've never tried to bag and freeze this one:
Cashew Crock-pot Chicken from Sally Cooks

Note: If you Crock-pot the broccoli like the recipe says, it overpowers the dish (and your house, with the smell. I mean, BAAAAD!!!). The second time around, I steamed the broccoli in the microwave and added it at the table. I also added cashews just for the last few minutes to warm them up so they'd stay crunchy.
Finally, our favorite crock pot recipe of all time, courtesy of my mom.
Easy Roast and Veggies
- large roast (I'm not skilled enough in the world of meat to tell you what kind. I'm sure I've tried rumps, pork butts, beef, and other words that I'm not recalling right now, and it's always good. Just look for a big hunk of meat surrounded by fat and you should be good...)
- Worcestershire sauce
- carrots, cut into large slices (or baby carrots)
- potatoes, cut into large chunks
- salt, pepper
There’s something about coming home to the smell of a meal that’s cooked all day in a slow cooker that makes you feel like a rock star. Also, slow cooked meals are often healthy and have several food groups all rolled into one meal. My favorite use for the Crock-pot is cooking chicken from frozen to shreddable. I have a lot of recipes that call for cooked, cut-up chicken. My sister-in-law taught me that you can throw frozen chicken in the pot with a cup or two of chicken broth and some seasoning and come home to perfect, shreddable chicken. I just dump off the broth and stir the chicken with a fork and it’s ready to throw in my chicken dish. You changed my life, Jenica! You can also just add BBQ sauce to the shredded chicken (or a beef or pork roast cooked all day in juice) and have excellent BBQ sandwiches with no effort.
Almost any soup recipe can be made in a slow cooker. I dump all the ingredients in the pot the night before, cram the pot in the fridge, and set it in the cooker the next morning.
There are a wealth of Crock-pot freezer recipes. I think I have four sites pinned on Pinterest (on my cooking board or my "did it" board) each linking to four or five recipes. The beauty of these recipes is that you make them ahead (on a weekend or some other free time), throwing all the ingredients together in a gallon freezer bag. The day you want the meal, you just peel the bag off of the ice chunk, throw it in the Crock-Pot, and come home to a hot veggie and meat entree. Our two favorite freezer bag recipes:
Teriyaki Pork Chops and Hawaiian Chicken Sandwiches (and several others) from Saving You Dinero
And another favorite, though I've never tried to bag and freeze this one:
Cashew Crock-pot Chicken from Sally Cooks
Note: If you Crock-pot the broccoli like the recipe says, it overpowers the dish (and your house, with the smell. I mean, BAAAAD!!!). The second time around, I steamed the broccoli in the microwave and added it at the table. I also added cashews just for the last few minutes to warm them up so they'd stay crunchy.
Finally, our favorite crock pot recipe of all time, courtesy of my mom.
 |
| Not quite sure how I got the lid on this beast... |
Easy Roast and Veggies
- large roast (I'm not skilled enough in the world of meat to tell you what kind. I'm sure I've tried rumps, pork butts, beef, and other words that I'm not recalling right now, and it's always good. Just look for a big hunk of meat surrounded by fat and you should be good...)
- Worcestershire sauce
- carrots, cut into large slices (or baby carrots)
- potatoes, cut into large chunks
- salt, pepper
1) Place roast in slow cooker, fatty side up. Surround with veggies.
2) Glub almost a whole bottle of Worcestershire sauce over the bad boy.
2) Glub almost a whole bottle of Worcestershire sauce over the bad boy.
3) Salt and pepper to your liking.
4) Slow cook on low for 8-10 hours.
5) Skim off fat, shred, and enjoy!
For 7 more tips, follow the links at How to Cook When it's Already Time to Eat.
4) Slow cook on low for 8-10 hours.
5) Skim off fat, shred, and enjoy!
For 7 more tips, follow the links at How to Cook When it's Already Time to Eat.
Thursday, March 6, 2014
H2C: Mrs. Freeze
This post is part of a series called: How to Cook Supper When it's Already Time to Eat, cheesily referred to as H2C.
In addition to the wealth of freezer cooking recipes you can find online, there are a lot of ways to use your freezer to make meal time a breeze. Consider these ideas:
When you make a casserole, double the recipe, cook one now and freeze one for later. Smaller families could split a single recipe into two smaller pans and save themselves from having to eat lasagna six nights in a row.
Search "Crock-pot freezer meals" on Pinterest and prepare to be amazed! I don't cook a months worth like so many bloggers do, but I will put together two or three similar recipes in gallon bags when I'm already chopping onions and I have a little extra time. If you take the blade out of your blender, it makes a perfect container to prop open the gallon bags while you pour in liquids.

Brown two or three pounds of burger with onions, peppers, and shredded carrots. Bag it and freeze it. Now when a recipe calls for browned hamburger, you just have to grab a bag and you’ve already got veggies added in. I’ve started doing this to cut down on the amount of meat we eat, too. I brown 2 lb of deer burger with veggies, use 1/3 for that night’s meal and split the remaining meat into two freezer bags. Now I’m reducing the meat in recipes by 1/3 pound and prepping ahead. I also cook up a bunch of chicken at one time, shred it, and freeze it in small containers.


When you make waffles, french toast or pancakes, make extra and freeze. All you have to do is pop them in the toaster the next morning!
Make burritos and freeze individually wrapped in foil. Bag the bunch in the tortilla bag and get out only what you need.

Cut up peppers or onions, shred zucchini, or puree’ sweet potatoes and freeze in small containers, like baby food jars. You’ve just saved yourself some prep work for a future meal. This works great when you have an abundance of produce or need to use something up before it spoils.
Do you have more leftovers than you can handle? Freeze em’ and you have a bonus meal - or at least a side. If you freeze a little bit of soup, just add sandwiches another night for a beefier meal.
Reed’s favorite meal (from a friend, neighbor, and former coworker - thanks, Tina!) is one you can make and freeze partially. We eat it for supper, but it also works great for breakfast when you have company and want to look like a super hostess, but don’t want to get up at the butt crack of dawn to do it.

- cooked, crumbled bacon and/or sausage
- can of biscuits or crescent rolls
In addition to the wealth of freezer cooking recipes you can find online, there are a lot of ways to use your freezer to make meal time a breeze. Consider these ideas:
When you make a casserole, double the recipe, cook one now and freeze one for later. Smaller families could split a single recipe into two smaller pans and save themselves from having to eat lasagna six nights in a row.
Search "Crock-pot freezer meals" on Pinterest and prepare to be amazed! I don't cook a months worth like so many bloggers do, but I will put together two or three similar recipes in gallon bags when I'm already chopping onions and I have a little extra time. If you take the blade out of your blender, it makes a perfect container to prop open the gallon bags while you pour in liquids.
Brown two or three pounds of burger with onions, peppers, and shredded carrots. Bag it and freeze it. Now when a recipe calls for browned hamburger, you just have to grab a bag and you’ve already got veggies added in. I’ve started doing this to cut down on the amount of meat we eat, too. I brown 2 lb of deer burger with veggies, use 1/3 for that night’s meal and split the remaining meat into two freezer bags. Now I’m reducing the meat in recipes by 1/3 pound and prepping ahead. I also cook up a bunch of chicken at one time, shred it, and freeze it in small containers.
Make burritos and freeze individually wrapped in foil. Bag the bunch in the tortilla bag and get out only what you need.
Cut up peppers or onions, shred zucchini, or puree’ sweet potatoes and freeze in small containers, like baby food jars. You’ve just saved yourself some prep work for a future meal. This works great when you have an abundance of produce or need to use something up before it spoils.
Do you have more leftovers than you can handle? Freeze em’ and you have a bonus meal - or at least a side. If you freeze a little bit of soup, just add sandwiches another night for a beefier meal.
Reed’s favorite meal (from a friend, neighbor, and former coworker - thanks, Tina!) is one you can make and freeze partially. We eat it for supper, but it also works great for breakfast when you have company and want to look like a super hostess, but don’t want to get up at the butt crack of dawn to do it.
Breakfast Casserole
- cooked, crumbled bacon and/or sausage
- can of biscuits or crescent rolls
- shredded cheese (about 2 c)
- 4-8 eggs
- 3/4 c milk
- salt/pepper
- butter
1) Butter a 9x13 pan. Mush biscuits into a crust.
2) Sprinkle meat and cheese on top of biscuits.
3) Freeze at this point (or not). Put in fridge to thaw the night before you want to use.
4) Whisk eggs, milk, salt, and pepper in a bowl and pour over biscuits.
5) Cook 15 mn (or until eggs are done) at 425 degrees.

- 4-8 eggs
- 3/4 c milk
- salt/pepper
- butter
1) Butter a 9x13 pan. Mush biscuits into a crust.
2) Sprinkle meat and cheese on top of biscuits.
3) Freeze at this point (or not). Put in fridge to thaw the night before you want to use.
4) Whisk eggs, milk, salt, and pepper in a bowl and pour over biscuits.
5) Cook 15 mn (or until eggs are done) at 425 degrees.
Wednesday, March 5, 2014
H2C: Meal Planning
This post is part of a series called: How to Cook Supper When it's Already Time to Eat (H2C - cheesy, I know, but it was better than H2CWIAT2E).
I hate, hate, hate driving home knowing I have no plan for supper. I don't even drive past a gas station, much less a restaurant, so fast food isn't an option. And we're tightwads, so there's not usually a pizza in the freezer, though that would be smart...


I actually stole this post idea from my sister. She has had two of the cutest menu boards ever! See her first menu board and read about how she plans meals for two here. Since that post, her glass menu board broke, and she's replaced it with this one from Ikea:
My sister-in-law does her meal planning the high-tech way. She posts her weekly meal plan on her blog, linking each recipe to its source. Then, she makes notes about certain recipes that go over well or flop. Check out her latest "Meal Deal" here.
With a plan in place, half the suppertime battle is over. Now I just have to execute...
For 7 more tips, follow the links at How to Cook When it's Already Time to Eat.
I hate, hate, hate driving home knowing I have no plan for supper. I don't even drive past a gas station, much less a restaurant, so fast food isn't an option. And we're tightwads, so there's not usually a pizza in the freezer, though that would be smart...
So, once a week, I sit down with a grocery ad flier, shopping list, recipes, our calendar and a notecard. First, I flip through the grocery ads and put items that are on sale on my shopping list. I try to keep ingredients stocked by buying multiples of things we use often while they’re on sale. If the sale ads inspire a meal for the week, even better.
The next thing I look at are my recipes. In addition to Pinterest ideas, I have cookbooks and a binder full of ideas I’ve torn from magazines. Anything I try and we like gets written on a recipe card and added to the recipe box. The boys have invented an elaborate scoring method for new meals. It's called "thumbs up, thumbs down, thumbs sideways, one thumb up/one thumb slightly up, both thumbs up with an exaggerated happy face, etc." Their assessment of spaghetti squash replacing noodles in our normal spaghetti recipe? Let's just say it didn't rank up there with sopapilla ice cream...
Most of our meals are planned from the tried-and-true box, but I try to sneak a new idea in about once a week to keep things interesting. I also try to keep in mind if we have anything about to spoil that needs to be used up quickly.
After I’ve found five or six meals I’d like to make that week, I pull out the recipe cards (or magazine page) and stash them in the front of the recipe box so they’re easy to find. Then, I look at our calendar and see what nights I need quick-and-easy and what nights I can spend a little more time chopping and dicing. I plan a slow cooker meal or leftovers on nights when I know there will be no time to cook.
Then, I write up a menu on an index card. If the recipe came from Pinterest or a cookbook, I write the page number or location on the card so it’s easy to find. If I need to prep something a day ahead of time (like Crock-pot meals), I make a note on the card so I don’t forget. I clip this menu to a cute mini clipboard in my pantry.
 |
| from ntyrordinarysmith.blogspot.com |
With a plan in place, half the suppertime battle is over. Now I just have to execute...
For 7 more tips, follow the links at How to Cook When it's Already Time to Eat.
Tuesday, March 4, 2014
How to Cook Supper When It's Already Time to Eat

So, I pretty much hate getting supper ready. It's not that I mind cooking, it's just that time, budget, and tastes coupled with a million other after-school demands makes meal preparing a stressful time. But I’ve learned a few tricks over the years that have helped me serve mostly home-cooked meals with semi-regularity (ignore all the qualifiers - I’m not pretending to be Martha!) I've decided to compile these ideas on this blog as a series. Below are six ideas I use that help tame the supper stress. For each one, I’ll elaborate in a future post.
1) Plan
Given the time and ingredients, I would rather cook a seven-course meal for my family then to come up with a quick and easy idea on the fly. There’s nothing I hate more than coming home with no idea what we’re going to have for supper. That’s where we’re blessed to live far away from fast food, or I’m sure we'd be eating Big Macs every night. I don’t particularly enjoy coming up with supper ideas, but I’d sure rather do it with a little time to think and prepare than an hour before we’re supposed to be eating it. I’ve found if I sit down and plan out a week’s meals, I’m already that much ahead of the game. I have the groceries on hand, I never have to worry about what meat is thawed, and I’m able to work around our schedule.
2) Use your freezer
There are tons of freeze-ahead recipes to be found online. There are even entire cookbooks devoted to the topic. I get excited about the idea of spending one afternoon and having 44 meals, but realistically, it probably ain’t gonna happen around here. Instead, I do a little at a time.
3) Crock-pot it
While I don’t want to eat every meal from a Crock-pot, I do love me some hot, savory-smelling dinner ready when I walk through the door. I probably cook one night a week this way. I just have to remember to start it in the morning...
4) Make ahead
If we could eat supper at 9:00 every night, we’d have gourmet cooking (and by gourmet, I mean not Hamburger Helper). But every single one of us gets cranky when not fed, and I really enjoy our early bed time, so a late supper is not an option. But I can take advantage of the time after supper to make life easier for tomorrow’s meal.
5) Have side items on hand
This is my weakest area. I’m pretty good about planning main dishes and getting them ready on time, but I totally forget about sides until the food is about to hit the table. I’ve got a few tricks up my sleeve that make me look like I prepared sides, when really, they were just in my fridge already and I grabbed them at the last minute. Whatevs.
6) Delegate and distract
Put your family members to work. Or if they can’t stand the heat, get em’ outta the kitchen!
7) Plan for leftovers
"Leftovers" doesn’t have to be a dirty word. In addition to one meal a week being a clean-out-the-fridge potluck affair, I also work leftovers into the menu plan by using them in new ways the next night.
8) Prepare for the (inevitable) worst
It's gonna happen. I'm going to be running late or feeling crappy or forget to thaw the meat. It's good to have some back up plans.
Sunday, January 12, 2014
Lego Table

If you know our boys, then you know there's not much they like better than Legos. The two bigguns, especially, are obsessed! As a result, we have mountains of the tiny pieces. When Reed started becoming interested in Legos, largely due to an impressive collection at Mrs. Pam's day care, I decided to copy Mrs. Pam's organizational strategy for the plastic pieces: store 'em all mishmashed together on a Lego table. I took two end tables, set them side-by-side, hammered a little trim around the surface and, voila, an instant surface to play and store Legos.

This did not last long. I swear Legos multiply at night (oftentimes on the floor). We soon had two large storage tubs filled with the bricks under the end tables. The tabletop was still constantly loaded. The only purpose it served was a good place to aim when putting toys away Calvin-style (chucking them in the general direction of some receptacle). So, this year for Christmas, I made a new, improved Lego table for


Whether there's plenty of room for all of their Legos remains to be seen. We still have the two storage tubs under the end tables. At this point you can see some of the surface of the table, which is more than you could say for the last one. However, they still have Christmas money to burn and I know what they'll spend it on.
I'm not too worried, though. The boys received about 10 Lego sets for Christmas. Guess where they assembled nine of them?

All over the floor...
Linking up to: Hunt and Host: boys' room tour
Wednesday, November 20, 2013
Craft Nook: The Whole Shebang!
I was gonna do a post on how I designed and installed shelves in my craft nook all by my lonesome, but, really, who wants to see all the details? I used some wood. I painted it. I used a level and other impressive-sounding tools to install them. It took for-e-ver, and now it's done and I love it. The end. Wanna see?
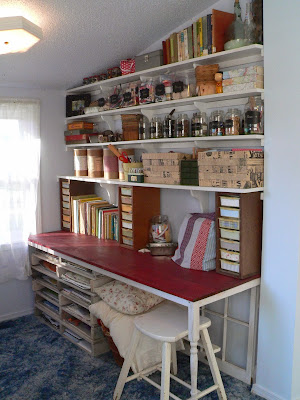


Click on the links for details on how to make the storage containers, decoupaged boxes, pallet desk, crib chalkboard easel, and crib springs bulletin board.
The kicker? The whole shebang only cost $122!!
Shelves:
Corbels $ 34
1x2" Support wood $ 19
1x12" shelf $ 9
1x8" shelves $ 14
Paint, screws on hand
Desk:
2 spindles $10
1x8" boards $15
1x12" board $ 11
1x2" apron wood $ 2
Mending plates Can't remember, but they were pennies each
Pallets FREE
paint, screws, stain on hand
Jars:
chalkboard contact paper $ 8
GRAND TOTAL - PRETTY STINKIN' GOOD!! (Unless, of course, you count the labor... But I thoroughly enjoyed most of the man-hours it took, so I don't count it!)
Linking up to Kammy's Korner Trash 2 Treasure Tuesday
Hunt and Host Laundry and Craft room linky party


Click on the links for details on how to make the storage containers, decoupaged boxes, pallet desk, crib chalkboard easel, and crib springs bulletin board.
The kicker? The whole shebang only cost $122!!
Shelves:
Corbels $ 34
1x2" Support wood $ 19
1x12" shelf $ 9
1x8" shelves $ 14
Paint, screws on hand
Desk:
2 spindles $10
1x8" boards $15
1x12" board $ 11
1x2" apron wood $ 2
Mending plates Can't remember, but they were pennies each
Pallets FREE
paint, screws, stain on hand
Jars:
chalkboard contact paper $ 8
GRAND TOTAL - PRETTY STINKIN' GOOD!! (Unless, of course, you count the labor... But I thoroughly enjoyed most of the man-hours it took, so I don't count it!)
Linking up to Kammy's Korner Trash 2 Treasure Tuesday
Hunt and Host Laundry and Craft room linky party
Monday, November 18, 2013
Pallet desk

Yippy, skippy! I made furniture! By myself! And it was mostly free! I started with four or five sets of pallets, free from the local hardware store. Ryan helped me saw them about in half with a skill saw (but just for the record, I learned how to use the skill saw later and I totally coulda done this step by myself!)

All of the pallets got a heavy sanding and a whitewashing with watered down wall paint.

This process took several days this summer, and life went on. This is what the nublins did while mama was cutting, cleaning, sanding, and painting.


Then, I simply stacked the pallets on top of each other for the left half of my desk.

For the top, I used two 1x8" and a 1x12" board. I dry brushed them with red craft paint, sanded, then used a mixture of stain and black craft paint to make it look like weathered barn wood. I was thrilled with the results, though the pictures don't do it justice.
 |
| The bottom board is unsanded |
 |
| I brushed on the stain/paint combo, then wiped it off with a rag. The top board hasn't been wiped yet. |
I made a wood "apron" to go around the edge, but only the front and sides. I also used scraps from the apron to help hold the three boards together.

Those metal pieces are called "mending strips" and I thought about them when I looked up in the rafters of our shed. They're used to hold trusses together, but they work for slightly shoddily-crafted desks as well. I used two stair spindles for legs.

The pallet slots are perfect for all my scrapbook papers, maps, and vintage newspapers. I have stove drip pans for "drawers," but they're pretty flimsy. I'm thinking jumbo cookie sheets would be perfect, but they're not in the budget right at the moment.

And the desk is an adorable, practical addition to an unused corner of our bedroom, all for under $40!

Check out the whole craft set-up here.
Linking up to The Shabby Nest
Sunday, November 17, 2013
Decoupaged Boxes
My sister was cleaning out an attic somewhere a while back and came across stacks of local newspapers from the 50s. Who did she think would want to do some dumpster diving vicariously through her? Me, of course. I've got to admit, I've hardly used any since then, but not because I don't love it. On the contrary, I love it so much that no project seems worthy of using it up. Until now. One of my craft nook ideas was covered boxes. A workplace dumpster dive resulted in five perfect boxes. They were large and shallow - almost like board game boxes, but much sturdier. I mixed up a batch of homemade Mod-Podge and got to work. Using the newspaper like wrapping paper, I smeared glue under and then over it. Once it dried, it held very well, and most wrinkles worked themselves out.


I had planned on putting them back together as boxes with lids for storage, but they looked so adorable I wanted more! I stacked all five bases on one pile and all five lids (very slightly larger) on another. I had to fill them up to the brim to keep them from sliding down inside one another, but I had so many odds and ends to store, that was no problem. Now I have twice the impact, twice the storage, and I love it!


Check out the whole craft nook here.
Linked at Kammy's Korner
Subscribe to:
Posts (Atom)